A Whitelabel site or Microsite is a fully hosted, fully customized front-end experience for the Live publishing platform.
How does it Work? We copy one of your pages, add our Live publishing technology to the main content area, and serve the page from our servers. We disguise the URL with a URL of your preference so that search engines and users attribute the content to you.
How can I create a Whitelabel (Microsite)?
Step 1: CREATE A WHITELABEL TEMPLATE
The first step in creating a whitelabel is to create a template page hosted on your servers, with a an empty div and the id= Livee” (e.g.: <div id="livee"></div>). This will allow us to inject your Live stream onto your whitelabel site (microsite).
Template example: https://yoursite.com/livetemplate/index.html
This template page is hosted on your servers, allowing you to maintain full control over it and make changes at any time. We then ‘scrape’ your template page, and host your Whitelabel (microsite) on our servers, checking back every few minutes for any changes you may have made to your template. These changes are reflected on your Whitelabel site (microsite) and are made Live as soon as we have received them.
**Note: Only Template pages that return HTTP-200 will be used by the Template-Updater**
Step 2: SET UP A WHITELABEL TEMPLATE WITHIN LIVE
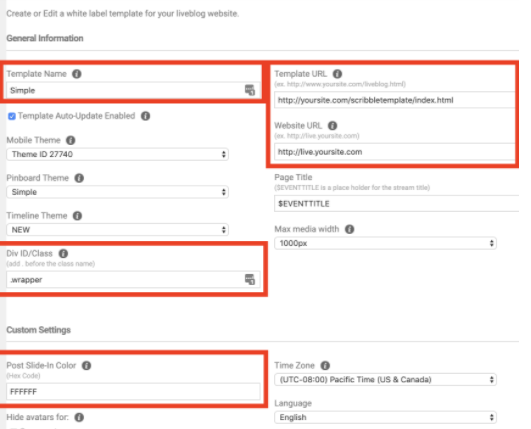
After setting up a template page, you'll need to log in to client.scribblelive.com and navigate to the Manage Templates page. Select Create New to create a new Whitelabel template which you will fill out. The template created in Step 1 should be placed in the Template URL field.
Note: Whitelabel licenses will need to be included in your contract to be able to create Whitelabels in your account. Contact your CSM (or help@rockcontent.com) in order to acquire Whitelabel licenses.

Step 3: SET UP A CNAME WITH YOUR SERVER ADMINISTRATOR
After setting up a Whitelabel template in Live, you'll need to set up a CNAME. To set up a CNAME, contact your server administrator or hosting company and ask them to ‘CNAME livee.yoursite.com to yoursite.site.live.com.’ This is how we communicate to users and search engines that this content is your content (even though it’s hosted on our servers.) Confirm with your server administrator that the site is working before moving on to the next step.
What is a CNAME?
- Technical Definition: a CNAME record or Canonical Name record, is a type of resource record in the Domain Name System (DNS) that specifies that the domain name is an alias of another canonical domain name.
- Non-Technical Definition: Your Whitelabel site or microsite is hosted on our servers. We borrow a domain name from you (e.g., live.yoursite.com), and disguise the Whitelabel site or microsite with your preferred domain name. This means search engines, and your site visitors will view any content found on your Whitelabel site or microsite like it's still a part of your website.
Step 4: SEND A CNAME REQUEST TO LIVE
Once you have set up the CNAME with your server administrator, place a request for CNAMEs with the LIVE Support team. All we need to know is which Whitelabel should be pointed to which domain.
Information to include in the request:
- Name of the Whitelabel (e.g. Test Wall)
- Whitelabel domain (e.g. http://test.site.scribblelive.com or https )
- Alias domain (e.g. http://wall.test.com)
We will perform various tests and notify you once the Whitelabel is up and running. It takes approximately 48 hours for your CNAME to take effect.
HTTPS?
Please specify in your email if your Whitelabel should be https-enabled. This will prevent any unnecessary error messages.
If you are enabling SSL on your Whitelabel, reach out to help@rockcontent.com with the above information. We then support your domain name by generating an SSL certificate request and send it back to you for approval. Once the request has been approved by you and the SSL certificate is made available in our AWS account, we will provide you further instructions to complete the final steps.
Note: We recommend that you perform your own tests 24 hours before hosting your live event.
.png?height=120&name=rockcontent-branco%20(1).png)